This post is a prequel to a series of in-depth reviews of state management libraries for React. Catch new posts in the series by signing up for the monthly posts.
In the last monthly post, I mentioned that I will be doing in-depth reviews of state management libraries for the next few months. To make these reviews thorough, I planned to refactor a real web app each month to use a different library.
However, the real projects I am working on are too big for me to refactor in a month. So I had to create a new web app from scratch to use for this series of reviews. To make it as close to a real web app as possible, I also setup a live REST API for the app to use. In this post, I will share how I built this sample web app and some of the surprising things I learnt along the way.
TLDR; You can find the code for the sample app here and see it running here. I will be refactoring it to use different state management libraries in the coming months to compare the performance and developer experience of each.
- What is the quintessential web app?
- Building a time-tracking app
- Measurements and benchmarks
- Issues
- Notes
- Coming up next
What is the quintessential web app?
Web apps come in all shapes and sizes. How could a single app represent all of them?

I decided to think in terms of features. Generally, most web apps have the following features.
- Retrieving data from and sending data to a REST API (CRUD)
- Authenticating and authorizing users
- Displaying multiple screens
So the sample app had to have at least those features. After pondering several options, I settled on building a small time-tracking app that would let users track the amount of time they spent on different tasks. Why a time-tracking app? Because I have a strange obsession with them and have built several in the past.
Building a time-tracking app
Now I had to decide how to build this time tracking app.
SPA
The web app had to be a React SPA (Single Page Application) since the theme of the series is state management libraries. So I bootstrapped a React SPA project using Vite.
Since we will be comparing several libraries, I decided not to use any state management libraries for the initial app and only use React Context and React hooks. This way we can also compare each library against an app with no state management libraries.
I ended up using the following packages to make my life a bit easier
history- A small library that makes it easier to interact with the History API. The de facto standard for routing in a React SPA is to use React Router. But recent versions of React router have data fetching functionality built in. I think it will be interesting to look at it separately in a future post.ky- A small library that makes it easier to interact with the Fetch API. The most common library for making requests to a REST API is Axios. Butkyclaims to offer similar functionality with less Javascript to ship. So I decided to give it a try.@tabler/icons-react- A collection of SVG icon components. A few icons are used to add some eye candy.clsx- A small utility function that makes it easier to work with class names.destyle.css- A CSS reset.
Backend
For the backend, I decided to use PHP-CRUD-API. It is a single PHP script that provides a REST API for a MySQL database. I was already paying for some PHP web hosting to run my blogs so using PHP meant that I would not have to pay extra to host the backend.
Meet Timo
Real web apps have names. So let's call the sample app Timo.
It has three screens, one for logging in and signing up, another for viewing and changing time entries and finally, a screen with a timer for creating new time entries. You can try it out yourself here.

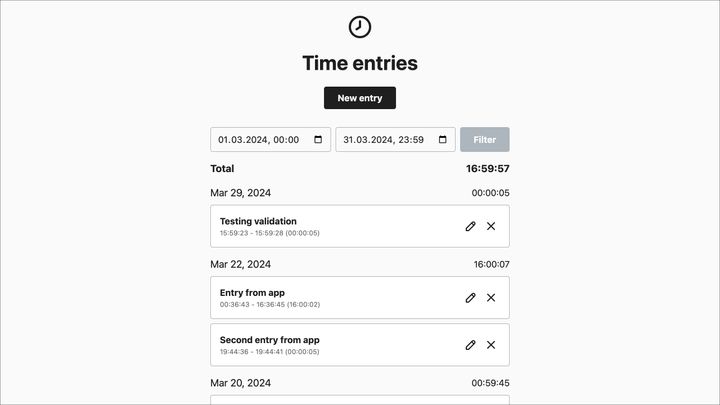
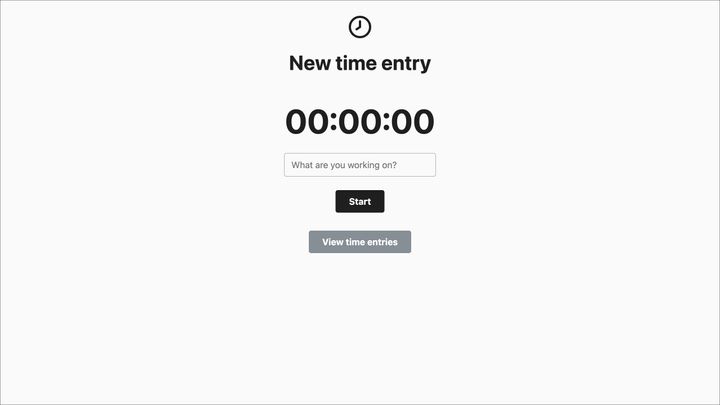
Measurements and benchmarks
Lines of code
I split the app into two projects, @timo/react and @timo/common so that future implementations can be in separate projects and share code through the @timo/common project.
Here is what cloc has to say about the lines of code in these projects.
packages/react
-------------------------------------------------------------------------------
Language                     files          blank        comment           code
-------------------------------------------------------------------------------
JSX                              5             41              1            430
CSS                              4             16              0             96
JSON                             1              0              0             22
JavaScript                       1              1              1             20
HTML                             1              0              0             13
-------------------------------------------------------------------------------
SUM:                            12             58              2            581
-------------------------------------------------------------------------------
packages/common
-------------------------------------------------------------------------------
Language files blank comment code
-------------------------------------------------------------------------------
JSX 12 65 1 311
CSS 10 14 1 110
JavaScript 11 10 1 81
JSON 1 0 0 19
-------------------------------------------------------------------------------
SUM: 34 89 3 521
-------------------------------------------------------------------------------packages/react + packages/common
-------------------------------------------------------------------------------
Language files blank comment code
-------------------------------------------------------------------------------
JSX 17 106 2 741
CSS 14 30 1 206
JavaScript 12 11 2 101
JSON 2 0 0 41
HTML 1 0 0 13
-------------------------------------------------------------------------------
SUM: 46 147 5 1102
-------------------------------------------------------------------------------These numbers don't mean much on their own. So here is the cloc output from a real React web app in production. It was created in 2018 with Create React App and has 21 routes with relatively simple content. It has a mixture of class and functional components and is in the middle of a migration from Redux + Redux Saga to Redux toolkit. Let's call this app the Real Deal.
src
-------------------------------------------------------------------------------
Language                     files          blank        comment           code
-------------------------------------------------------------------------------
JavaScript                     187           1034            131           7682
SCSS                            76            577             48           3522
SVG                             84              3             15           1577
JSON                             1             33              0            287
-------------------------------------------------------------------------------
SUM:                           348           1647            194          13068
-------------------------------------------------------------------------------
I consider the Real Deal to be a medium size web app based on my experience. It has roughly 9x more Javascript code than Timo which means nothing at this point but maybe we can multiply changes to the line count when Timo is refactored to get an idea of what the change might be in a real app.
Build artifacts
Here are the sizes of the files in a production build of Timo.
$ npm run build -w @timo/react

> @timo/react@0.0.1 build
> vite build

vite v5.1.6 building for production...
✓ 5312 modules transformed.
dist/index.html                     0.47 kB │ gzip:   0.30 kB
dist/assets/index-C60zlibj.css      5.53 kB │ gzip:   1.84 kB
dist/assets/index-DGyaFOHP.js     172.79 kB │ gzip:  55.52 kB
✓ built in 4.04s
For a rough comparison, here are the files in a production build of the Real Deal.
$ npm run build

> real-deal@1.10.1 build
> NODE_ENV=production react-scripts build

Creating an optimized production build...
Compiled successfully.

File sizes after gzip:

  273.16 kB  build/static/js/main.37b34c2e.js
  33.91 kB   build/static/css/main.a9d9feca.css

The project was built assuming it is hosted at /.
You can control this with the homepage field in your package.json.

The build folder is ready to be deployed.
You may serve it with a static server:

  yarn global add serve
  serve -s build

Find out more about deployment here:

  https://cra.link/deployment
CRA is a bit deceiving here since it only shows the gzipped file sizes. Here are the sizes of the files when uncompressed.
$ ls -lh -R build/static
total 0
drwxr-xr-x@   3 bash  bash    96B Apr  5 14:11 css
drwxr-xr-x@   4 bash  bash   128B Apr  5 14:11 js

build/static/css:
total 224
-rw-r--r--@ 1 bash  bash   109K Apr  5 14:11 main.a9d9feca.css

build/static/js:
total 1784
-rw-r--r--@ 1 bash  bash   886K Apr  5 14:11 main.37b34c2e.js
-rw-r--r--@ 1 bash  bash   1.8K Apr  5 14:11 main.37b34c2e.js.LICENSE.txt
Real deal has a Javascript bundle that is ~5x larger and a CSS bundle that is ~20x larger than Timo.
Bundle analysis
If we dive into the Javascript bundle, this is what we find. You can find the interactive version here.
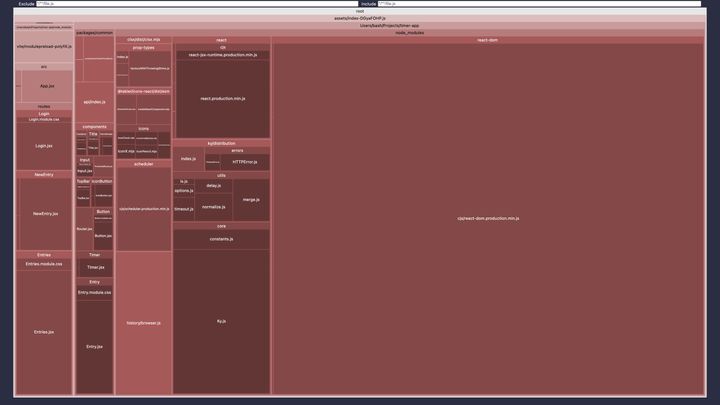
Here is a breakdown in percentages.
- node_modules - 85.58% (176.34KB)
- @timo/react - 7.65% (15.77KB)
- @timo/common - 5.83% (12.01KB)
and a percentage breakdown of node_modules.
- react-dom - 62.94% (129.71KB)
- ky/distribution - 10.29% (21.2KB)
- react - 4.15% (8.56KB)
- history/browser.js - 3.27% (6.74KB)
- scheduler (react) - 2.09% (4.31KB)
- @tabler/icons-react/dist/esm - 1.66% (3.43KB)
- prop-types - 1% (2.05KB)
- clsx - 0.17% (362B)
I couldn't find a plugin similar to rollup-plugin-visualizer for analyzing the CSS bundle. So I analyzed it manually.
- @timo/react + @timo/common - 60.58% (3.35KB)
- destyle.css.min - 39.42% (2.18KB)
Performance
This is what the Chrome dev tools profiler says about Timo when it is run on my 2019 MacBook Pro.
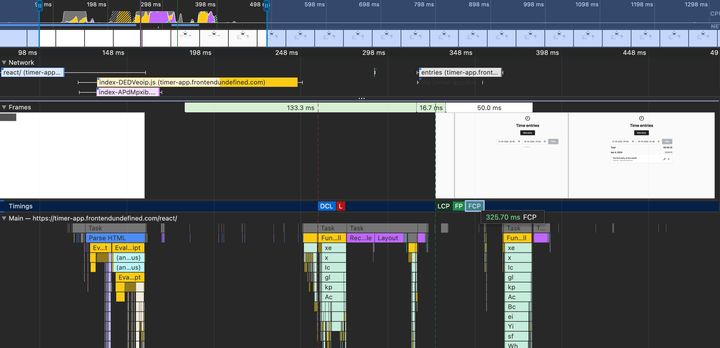
Here is what it looks like with 4x CPU throttling and a throttled network (Fast 3G).
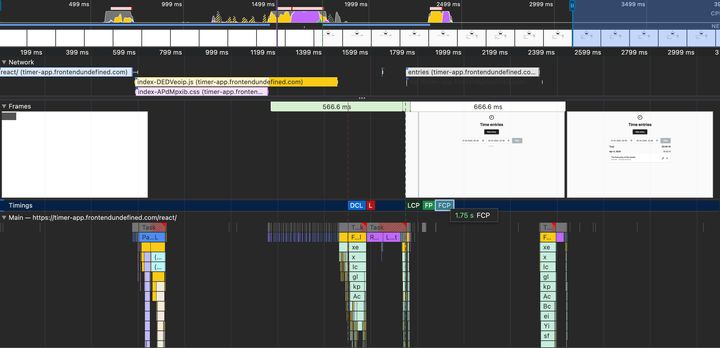
Google's Lighthouse considers a First Contentful Paint (FCP) score of less than 1.8s to be fast. Even though Timo is small, it only narrowly manages to be within that threshold when throttled.
In both cases, loading the Javascript bundle is the longest part of the load process. This is probably because Timo is hosted on shared web hosting on Hetzner with no CDN.
Issues
Timo currently has the following technical issues. Let me know if you find any more!
API requests are not cached on the frontend
No data is cached on the frontend so a request is made to the API every time the list of time entries is shown.
Requests to the API are duplicated when running in development mode
The app needs to make requests to the API when a screen is loaded to check the authorization status and to download the time entries that will be shown. The only way to achieve this right now is to place the request to the API in a useEffect hook. useEffect hooks are fired twice when running locally in development mode when React Strict Mode is enabled.
Notes
Here are a few things I learnt/discovered while building Timo.
The native History API is tricky to work with
I had to implement the routing myself since I decided not to use React router. I thought that implementing a simple router on top of the native History API would be quite straightforward. But the native History API does not provide an event to listen to route changes. So I would have had to implement a way to track when the route was changed myself. Instead, I looked at how React router solved this and found that it used the relatively small history package to deal with the History API. So I did the same.
Third-party cookies are dead
Last year I built an early prototype of a web app with the web app living on one subdomain and the API on another using cookies for authorization. This didn't work on Safari if the two were on two separate root domains but it worked when they were on two subdomains of the same root domain. Chrome didn't care and sent the auth cookies to the API in both cases. So I initially planned Timo's web app to be hosted on GitHub pages at timo.frontendundefined.com and the API to be hosted on Hetzner at timo-api.frontendundefined.com
But it didn't work. Now Chrome was also not sending the auth cookies to the API when the web app was making requests from its domain. So I had to stop using cookies for authorization or host the web app and the API on the same domain. I chose the latter option to keep things simple. Now, everything is hosted on Hetzner web hosting.
Vite and Create React App have built-in proxy servers
With the stricter cookie policy, it wasn't possible for an app running on localhost to send auth cookies to an API hosted at timo.frontendundefined.com/api. While trying to fix this, I found that both Create React App and Vite have built-in proxies to proxy requests from localhost to whatever domain. (Proxying API Requests in Development | Create React App, Server Options | Vite)
CDNs make a sizeable difference
Out of curiosity, I also profiled the Real Deal on production. Embarrassingly, I found that the build artifacts were not being served compressed. All of the HTML, CSS and Javascript were being sent over the network uncompressed. But it still has a load time that was similar to Timo while being several times larger. How could this be?
The answer was a CDN (Content Delivery Network). Real Deal was hosted on a AWS Cloudfront and it managed to repeatedly send the uncompressed Javascript bundle (886KB, 16X) faster than Timo's compressed Javascript bundle (55KB, 1X). Timo was hosted in the same region where I live (eu-central) so Cloudfront must have a PoP that was even closer to me.
Coming up next
With the sample app done, we can now start diving into different state management libraries.
In the next monthly post, I will introduce you to the libraries that we will be taking a look at and how each of them could be categorized. You can sign up below to get the monthly posts directly to your e-mail.
